Core: AWS Batch
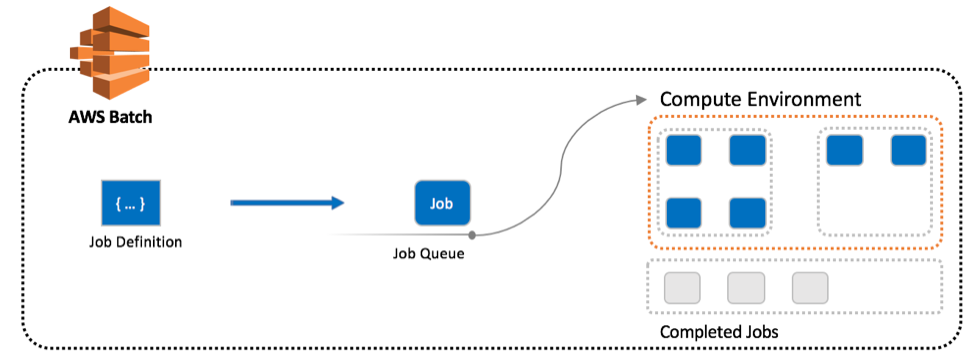
AWS Batch is a managed service that helps you efficiently run batch computing workloads on the AWS Cloud. Users submit jobs to job queues, specifying the application to be run and the compute resources (CPU and memory) required by the job. AWS Batch is responsible for launching the appropriate quantity and types of instances needed to run your jobs.
AWS Batch manages the following resources:
- Job Definitions
- Job Queues
- Compute Environments
A job definition specifies how jobs are to be run. For example, which Docker image to use for your job, how many vCPUs and how much memory is required, the IAM role to be used, and more.
Jobs are submitted to job queues where they reside until they can be scheduled to run on Amazon EC2 instances within a compute environment. An AWS account can have multiple job queues, each with varying priority. This gives you the ability to closely align the consumption of compute resources with your organizational requirements.
Compute environments are effectively autoscaling clusters of EC2 instances that are launched to run your jobs. Unlike traditional HPC clusters, compute environments can be configured to use a variety of instance types and sizes. The AWS Batch job scheduler will do the heavy lifting of placing jobs on the most appropriate instance type based on the jobs resource requirements. Compute environments can also use either On-demand instances, or Spot instances for maximum cost savings. Job queues are mapped to one or more compute environments and a given environment can also be mapped to one or more job queues. This many-to-many relationship is defined by the compute environment order and job queue priority properties.
The following diagram shows a general overview of how the AWS Batch resources interact.
For more information, watch the How AWS Batch Works video.
Job Requirements
AWS Batch does not make assumptions on the structure and requirements that Jobs take with respect to inputs and outputs. Batch Jobs may take data streams, files, or only parameters as input, and produce the same variety for output, inclusive of files, metadata changes, updates to databases, etc. Batch assumes that each application handles their own input/output requirements.
A common pattern for bioinformatics tooling is that files such as genomic sequence data are both inputs and outputs to/from a process. Many bioinformatics tools have also been developed to run in traditional Linux-based compute clusters with shared filesystems and are not necessarily optimized for cloud computing.
When using AWS Batch for genomics workflows, there are a couple key considerations:
-
Independent execution:
To make your workflow as flexible as possible, each job should run independently. As a result, you cannot necessarily guarantee that different jobs in the same overall workflow will run on the same instance. Using S3 as the location to exchange data between containers enables you to decouple storage of your intermediate files from compute.
-
Multitenancy:
Multiple container jobs may run concurrently on the same instance. In these situations, it is essential that your job writes to a unique subdirectory.
-
Data cleanup:
As your jobs complete and write the output back to S3, it is a good idea to delete the scratch data generated by that job on the instance. This allows you to optimize for cost by reusing EC2 instances if there are jobs remaining in the queue, rather than terminating the EC2 instances.
Creating an AWS Batch Environment
A complete AWS Batch environment consists of the following:
- A Compute Environment that utilizes EC2 Spot instances for cost-effective computing
- A Compute Environment that utilizes EC2 on-demand (e.g. public pricing) instances for high-priority work that can't risk job interruptions or delays due to insufficient Spot capacity.
- A default Job Queue that solely utilizes the Spot compute environment. This is for jobs where timeliness isn't a constraint, and can wait for the right instances to become available, as well has handle interruption. It also ensures the most cost savings.
- A priority Job Queue that leverages the on-demand, and optionally Spot, CE's (in that order) and has higher priority than the default queue. This is for jobs that cannot handle interruption, and need to be executed immediately.
Automated via CloudFormation
The CloudFormation template below will create all of the above.
| Name | Description | Source | Launch Stack |
|---|---|---|---|
| AWS Batch | Creates AWS Batch Job Queues and Compute Environments. You will need to provide the details for your Launch Template ID, IAM roles and instance profiles, and the IDs for a VPC and subnets. | cloud_download | play_arrow |
Info
The launch button has been disabled above since this template is part of a set of nested templates. It is not recommended to launch it independently of its intended parent stack.
Manually via the AWS Console
Compute Environments
You can create several compute environments to suit your needs. Below we'll create the following:
- An "optimal" compute environment using on-demand instances
- An "optimal" compute environment using spot instances
"Optimal" is a default grouping of EC2 instance types used for compute environments. It includes M4 (general purpose), C4 (compute-optimized), and R4 (memory-optimized) instance families which should be suitable for a wide range of computing cases.
Create an "optimal" on-demand compute environment
- Go to the AWS Batch Console
- Click on "Compute environments"
- Click on "Create environment"
- Select "Managed" as the "Compute environment type"
- For "Compute environment name" type: "ondemand"
- In the "Service role" drop down, select the
AWSBatchServiceRoleyou created previously - In the "Instance role" drop down, select the
ecsInstanceRoleyou created previously - For "Provisioning model" select "On-Demand"
- "Allowed instance types" will be already populated with "optimal" - which is a mixture of M4, C4, and R4 instances. This should be sufficient for demonstration purposes. In a production setting, it is recommended to specify the instance famimlies and sizes most apprioriate for the jobs the CE will support. For the On-Demand CE, selecting newer instance types is beneficial as they tend to have better price per performance.
- "Allocation strategy" will already be set to
BEST_FIT. This is recommended for on-demand based compute environments as it ensures the most cost efficiency. - In the "Launch template" drop down, select the
genomics-workflow-templateyou created previously - Set Minimum and Desired vCPUs to 0.
Info
Minimum vCPUs is the lowest number of active vCPUs (i.e. instances) your compute environment will keep running and available for placing jobs when there are no jobs queued. Setting this to 0 means that AWS Batch will terminate all instances when all queued jobs are complete.
Desired vCPUs is the number of active vCPUs (i.e. instances) that are currently needed in the compute environment to process queued jobs. Setting this to 0 implies that there are currently no queued jobs. AWS Batch will adjust this number based on the number of jobs queued and their resource requirements.
Maximum vCPUs is the highest number of active vCPUs (i.e. instances) your compute environment will launch. This places a limit on the number of jobs the compute environment can process in parallel.
For networking, the options are populated with your account's default VPC, public subnets, and security group. This should be sufficient for the purposes of this workshop. In a production setting, it is recommended to use a separate VPC, private subnets therein, and associated security groups.
Optional: (Recommended) Add EC2 tags. These will help identify which EC2 instances were launched by AWS Batch. At minimum:
- Key: "Name"
- Value: "batch-ondemand-worker"
Click on "Create"
Create an "optimal" spot compute environment
- Go to the AWS Batch Console
- Click on "Compute environments"
- Click on "Create environment"
- Select "Managed" as the "Compute environment type"
- For "Compute environment name" type: "spot"
- In the "Service role" drop down, select the
AWSBatchServiceRoleyou created previously - In the "Instance role" drop down, select the
ecsInstanceRoleyou created previously - For "Provisioning model" select "Spot"
- "Allowed instance types" will be already populated with "optimal" - which is a mixture of M4, C4, and R4 instances. This should be sufficient for demonstration purposes. In a production setting, it is recommended to specify the instance families and sizes most appropriate for the jobs the CE will support. For the SPOT CE a wider diversity of instance types is recommended to maximize the pools from which capacity can be drawn from. Limiting the size of instances is also recommended to avoid scheduling too many jobs on a SPOT instance that could be interrupted.
- "Allocation strategy" will already be set to
SPOT_CAPACITY_OPTIMIZED. This is recommended for Spot based compute environments as it ensures the most compute capacity is available for your jobs. - In the "Launch template" drop down, select the
genomics-workflow-templateyou created previously - Set Minimum and Desired vCPUs to 0.
For networking, the options are populated with your account's default VPC, public subnets, and security group. This should be sufficient for the purposes of this workshop. In a production setting, it is recommended to use a separate VPC, private subnets therein, and associated security groups.
Optional: (Recommended) Add EC2 tags. These will help identify which EC2 instances were launched by AWS Batch. At minimum:
- Key: "Name"
- Value: "batch-spot-worker"
Click on "Create"
Job Queues
AWS Batch job queues, are where you submit and monitor the status of jobs.
Job queues can be associated with one or more compute environments in a preferred order. Multiple job queues can be associated with the same compute environment. Thus to handle scheduling, job queues also have a priority weight as well.
Below we'll create two job queues:
- A "Default" job queue
- A "Priority" job queue
Both job queues will use both compute environments you created previously.
Create a "default" job queue
This queue is intended for jobs that do not require urgent completion, and can handle potential interruption. This queue will schedule jobs to only the "spot" compute environment.
Note
It is not recommended to configure a job queue to "spillover" from Spot to On-Demand. Doing so could lead Insufficient Capacity Errors, resulting in Batch unable to schedule jobs, leaving them stuck in "RUNNABLE"
Because it leverages Spot instances, it will also be the most cost effective job queue.
- Go to the AWS Batch Console
- Click on "Job queues"
- Click on "Create queue"
- For "Queue name" use "default"
- Set "Priority" to 1
-
Under "Connected compute environments for this queue", using the drop down menu:
- Select the "spot" compute environment you created previously
-
Click on "Create Job Queue"
Create a "priority" job queue
This queue is intended for jobs that are urgent and cannot handle potential interruption. This queue will schedule jobs to:
- The "ondemand" compute environment
- The "spot" compute environment
in that order. In this queue configuration, Batch will schedule jobs to the "ondemand" compute environment first. When the number of Max vCPUs for that environment is reached, Batch will begin scheduling jobs to the "spot" compute environment. The use of the "spot" compute environment is optional, and is used to help drain pending jobs from the queue faster.
- Go to the AWS Batch Console
- Click on "Job queues"
- Click on "Create queue"
- For "Queue name" use "priority"
- Set "Priority" to 100 (higher values mean higher priority)
-
Under "Connected compute environments for this queue", using the drop down menu:
- Select the "ondemand" compute environment you created previously, then
- Select the "spot" compute environment you created previously
-
Click on "Create Job Queue"